Not Yo’ Mama’s Banana Pudding
There’s something irresistibly nostalgic about banana pudding, especially when it’s made with layers of creamy filling, ripe bananas, and crunchy vanilla wafers. But this isn’t just any banana pudding—this is Not Yo’ Mama’s Banana Pudding, a rich, no-bake dessert that elevates the classic Southern favorite to new levels of decadence.

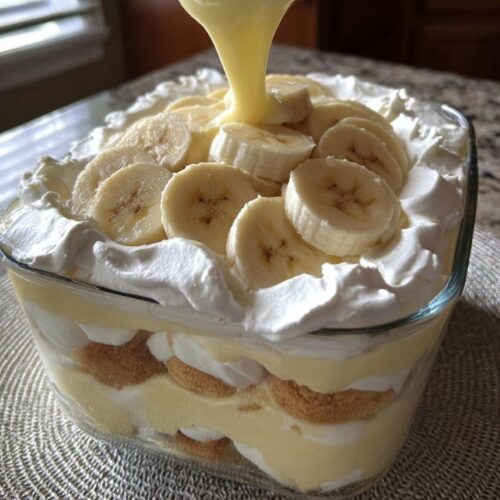
My first bite of this pudding took me straight back to warm family reunions and potluck dinners, where the dessert table was the most popular spot in the house. It’s sweet, creamy, and full of texture from the soft bananas and perfectly layered cookies. Ideal for holidays, BBQs, or just a sweet ending to a Sunday dinner.
Why You’ll Love Not Yo’ Mama’s Banana Pudding
- No-Bake Wonder: Perfect for hot days or when you want a fuss-free dessert.
- Creamy and Dreamy: Cream cheese and whipped topping make the filling extra luscious.
- Make-Ahead Friendly: Gets even better after chilling overnight.
- Crowd Favorite: Always the first dessert to vanish at potlucks.
- Layered Perfection: Combines texture, flavor, and comfort in every spoonful.
- Easy to Assemble: Simple layering, no complicated steps.
- Kid-Friendly: A great recipe for young helpers—they’ll love placing the wafers and bananas.
- Customizable: Use different cookies, flavored pudding, or add toppings to suit your taste.
Ingredients You’ll Need
- 2 (3.4 oz) packages vanilla pudding mix – Instant pudding works best for a quick set.
- 4 cups cold milk – Whole milk gives the richest, creamiest results.
- 1 (14 oz) can sweetened condensed milk – Adds silky sweetness and depth.
- 1 (8 oz) container whipped cream – Store-bought or 3 cups of homemade whipped topping.
- 8 oz cream cheese – Softened to room temperature for smooth blending.
- 1 teaspoon vanilla extract – Enhances the banana and vanilla flavors.
- 5-6 medium-sized ripe bananas – Firm but ripe bananas work best to maintain texture.
- 1 (12 oz) box vanilla wafers – Classic cookies that soften perfectly in the layers.
Step-by-Step Instructions
- Prepare the Pudding
- In a large mixing bowl, whisk the vanilla pudding mix with the cold milk.
- Whisk until smooth and allow it to sit for about 5 minutes to thicken.
- Make the Cream Cheese Mixture
- In a separate bowl, beat the softened cream cheese until light and fluffy.
- Gradually add the sweetened condensed milk and vanilla extract, mixing until fully incorporated and silky smooth.
- Fold in the Whipped Cream
- Carefully fold the whipped cream into the cream cheese mixture.
- Use a spatula to preserve the airy, whipped texture.
- Combine with Pudding
- Gently fold the prepared pudding into the cream cheese and whipped cream mixture.
- Stir until everything is smooth, light, and evenly mixed.
- Layer the Dessert
- In a large glass trifle bowl, 9×13-inch baking dish, or individual cups, start with a layer of vanilla wafers.
- Follow with a single layer of banana slices.
- Top with a thick layer of the pudding mixture.
- Repeat the layers: wafers, bananas, pudding.
- Finish with a layer of pudding, spreading it evenly over the top.
- Chill and Serve
- Cover tightly with plastic wrap.
- Refrigerate for at least 4 hours, but preferably overnight for best texture and flavor melding.

Serving and Storage Tips
- Serve Chilled: Always serve straight from the fridge for the best texture.
- Garnish Ideas: Top with crushed vanilla wafers, banana slices, or a dollop of whipped cream.
- Storage: Store tightly covered in the fridge for up to 3 days.
- Make Ahead: This dessert tastes better the next day, making it perfect for prep-ahead entertaining.
- Individual Servings: For parties or showers, layer the dessert into clear plastic cups or mini mason jars.
- Flavor Twist: Add a pinch of cinnamon to the pudding mix or use banana-flavored pudding for a bolder banana taste.
Helpful Notes
- Banana Ripeness: Use bananas that are fully ripe but still firm to avoid mushiness.
- Avoid Browning: Lightly coat banana slices with lemon juice if prepping far in advance.
- Cream Cheese Tip: Let the cream cheese sit out for 30 minutes before mixing to prevent lumps.
- Customize It: Swap vanilla wafers for butter cookies, graham crackers, or shortbread.
- Fun Add-Ons: Add a layer of chocolate chips, toffee bits, or even peanut butter swirls for a fun twist.
Frequently Asked Questions
- Can I use homemade pudding?
Absolutely! Just ensure it’s thickened and cooled before combining with the cream mixture. - What if I don’t have whipped topping?
You can make homemade whipped cream using heavy cream and sugar. - Can I make this the day before?
Yes! In fact, it’s highly recommended. The flavors blend beautifully overnight. - What’s the best way to serve this at a party?
Use a trifle dish or clear cups to show off the beautiful layers. - Can I freeze banana pudding?
Freezing isn’t ideal, as it can alter the texture of both the pudding and the bananas. - How do I prevent watery pudding?
Let it chill fully, don’t overmix, and use ripe but firm bananas.
Final Thoughts
Not Yo’ Mama’s Banana Pudding is more than just a dessert—it’s a Southern comfort classic reinvented for today’s kitchens. With its creamy filling, fresh bananas, and vanilla-scented layers, it brings back warm memories while creating new ones. It’s easy enough for beginners but impressive enough for any gathering. The hardest part? Waiting while it chills! Make it once and you’ll understand why it’s a forever favorite in so many homes. Don’t forget to snap a photo before it’s gone—you won’t have leftovers for long!
Not Yo’ Mama’s Banana Pudding
Ingredients
- 2 3.4 oz packages vanilla pudding mix
- 4 cups cold milk
- 1 14 oz can sweetened condensed milk
- 1 8 oz container whipped cream (or 3 cups homemade)
- 8 oz cream cheese softened
- 1 tsp vanilla extract
- 5 –6 ripe bananas
- 1 12 oz box vanilla wafers
Instructions
- Whisk pudding mix with cold milk; let sit 5 minutes to thicken.
- In a separate bowl, beat softened cream cheese.
- Add sweetened condensed milk and vanilla; mix until smooth.
- Fold whipped cream into cream cheese mixture.
- Gently fold in prepared pudding until well combined.
- In a 9×13 dish, layer wafers, sliced bananas, and pudding mixture.
- Repeat layers, ending with pudding on top.
- Cover and chill for at least 4 hours, preferably overnight.
Notes
- Use bananas that are ripe but not mushy.
- Toss banana slices in lemon juice to prevent browning.
- Store in fridge for up to 3 days.
- Serve in mason jars or cups for individual portions.
- Customize with graham crackers, flavored pudding, or toppings like toffee bits.