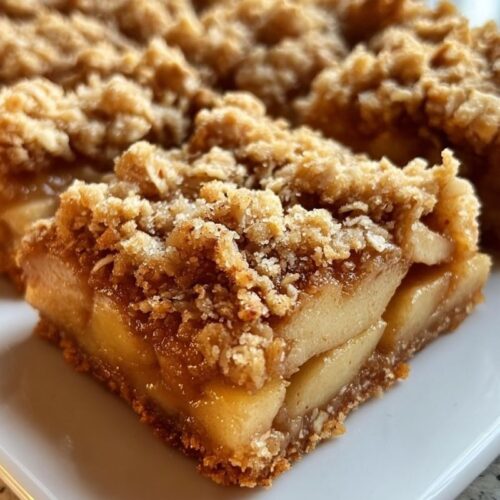
Easy Apple Crisp Bars
Some recipes just feel like home, and these Easy Apple Crisp Bars are the kind of treat that brings back memories of grandma’s kitchen, cool fall afternoons, and warm apple desserts served with a scoop of ice cream. I started making these bars as a simpler alternative to traditional apple crisp, and they’ve since become one of my most requested fall bakes. They’re easy, comforting, and absolutely packed with that cinnamon-apple goodness we all crave.

If you love apple crisp but want something you can cut, pack, or serve at a party, these bars are the perfect solution. They have all the elements of the classic dessert—a buttery oat crumble, soft spiced apples, and a golden-brown finish—but baked into a handheld form. They’re also super beginner-friendly and can be made with pantry staples and a few fresh apples. Whether you’re baking for a potluck, a holiday spread, or just to enjoy at home, Easy Apple Crisp Bars deliver every time.
Why You’ll Love Easy Apple Crisp Bars
- All the Flavor of Apple Crisp: Classic fall taste in an easy-to-serve bar form.
- One Bowl for the Crust and Topping: Minimal dishes, maximum payoff.
- Perfect for Make-Ahead: Holds up beautifully in the fridge and even better the next day.
- Crowd Pleaser: Makes 12 hearty bars, ideal for parties, bake sales, and gatherings.
- Flexible Recipe: Add nuts, dried cranberries, or a drizzle of caramel for extra flair.
- Freezer-Friendly: These bars freeze and reheat like a dream.
Ingredients You’ll Need
For the Crust and Topping:
- 2 cups all-purpose flour
Forms the base and topping for the bars. - 1 cup rolled oats
Gives the crumble a hearty, chewy texture. - 1 cup packed brown sugar
Adds rich sweetness and helps the bars hold together. - 1 teaspoon ground cinnamon
Warm spice that pairs perfectly with apples. - 1/2 teaspoon baking soda
Aids in a light, slightly raised crust. - 1/4 teaspoon salt
Balances sweetness and enhances flavor. - 1 cup unsalted butter, melted
Binds everything together and gives a rich flavor.
For the Apple Filling:
- 4 cups peeled and chopped apples (about 4 medium apples)
Use tart varieties like Granny Smith for contrast. - 1/4 cup granulated sugar
Sweetens and helps release apple juices. - 1 tablespoon lemon juice
Brightens the flavor and prevents browning.
Step-by-Step Instructions
- Preheat the Oven and Prep the Pan
- Preheat your oven to 350°F (175°C).
- Grease a 9×13-inch baking pan and line it with parchment paper, leaving a bit of overhang for easy lifting later.
- Mix the Crumble Base and Topping
- In a large bowl, combine flour, oats, brown sugar, cinnamon, baking soda, and salt.
- Pour in the melted butter and mix with a fork or your hands until the mixture resembles coarse crumbs.
- Form the Base
- Press about two-thirds of the crumble mixture evenly into the prepared pan.
- Use your fingers or a flat-bottomed cup to compact the crust layer.
- Make the Apple Filling
- In a separate bowl, toss the chopped apples with granulated sugar and lemon juice.
- Make sure all the apple pieces are coated evenly.
- Add the Apples
- Spread the apple mixture evenly over the crust.
- Use the back of a spoon to distribute the apples so they reach all the corners.
- Top with Remaining Crumble
- Sprinkle the remaining oat-flour mixture over the apples.
- Gently press it down to create a slightly compact topping.
- Bake to Perfection
- Bake for 40 to 45 minutes, or until the top is golden brown and the apples are fork-tender.
- The edges should be bubbly, and the kitchen will smell like heaven.
- Cool and Cut
- Allow the bars to cool completely in the pan.
- Use the parchment overhang to lift the bars out and transfer to a cutting board.
- Slice into squares or rectangles, depending on your preference.

Serving and Storage Tips
- Best Served: Slightly warm or at room temperature. Add a scoop of vanilla ice cream or drizzle with caramel for dessert-worthy flair.
- Storing Leftovers:
- Store in an airtight container at room temperature for up to 3 days.
- Refrigerate for up to 5 days for longer freshness.
- Freezing Tips:
- Wrap individual bars in parchment and place in a zip-top bag.
- Freeze for up to 2 months. Thaw overnight or warm in the oven before serving.
- Reheating:
- Microwave individual bars for 15–20 seconds.
- Or reheat in a 300°F oven for 8–10 minutes for a freshly baked feel.
Helpful Notes
- Apple Varieties: Granny Smith is ideal for tartness, but you can also mix with Honeycrisp, Pink Lady, or Fuji for added complexity.
- Add-Ins: Chopped walnuts, pecans, or dried cranberries make great additions to the topping.
- Spice Boost: Add a pinch of nutmeg or cloves for a warmer spice profile.
- Make it Gluten-Free: Use a gluten-free flour blend and certified GF oats.
- Make it Vegan: Substitute butter with vegan butter or coconut oil.
Frequently Asked Questions
- Can I make these bars ahead of time?
Yes! These bars are perfect for making a day ahead. The flavors develop even more after sitting overnight. - Do I need to cook the apples first?
Nope! The apples cook down perfectly in the oven, staying juicy with a tender bite. - Can I use quick oats instead of rolled oats?
You can, but the texture will be softer. Rolled oats provide the best crispiness. - How do I keep the crust from falling apart?
Press the base down firmly before baking, and allow the bars to cool completely before cutting. - What other fruits can I use?
Try pears, peaches, or a mix of berries for seasonal variations.
Final Thoughts
These Easy Apple Crisp Bars are the definition of cozy baking. With their buttery crumble, sweet apple filling, and crisp golden top, they’re everything you love about apple crisp—in a perfectly portable, shareable form. I love making a batch on Sunday to have on hand for weekday snacking, school lunches, or impromptu coffee guests.
I’ve made these dozens of times over the years, and they never fail to please a crowd. Even better, they’re super customizable to fit your pantry and flavor preferences. Once you make them, I guarantee they’ll earn a permanent spot in your fall baking rotation.
Let me know how you dress them up—with nuts, caramel drizzle, or a little extra cinnamon. I always love hearing your twists!
Happy baking!
Easy Apple Crisp Bars
Ingredients
Crust and Topping:
- 2 cups all-purpose flour
- 1 cup rolled oats
- 1 cup brown sugar packed
- 1 teaspoon ground cinnamon
- 1/2 teaspoon baking soda
- 1/4 teaspoon salt
- 1 cup unsalted butter melted
Apple Filling:
- 4 cups peeled and chopped apples about 4 medium apples
- 1/4 cup granulated sugar
- 1 tablespoon lemon juice
Instructions
- Preheat oven to 350°F (175°C). Grease and line a 9×13-inch pan with parchment paper, leaving an overhang.
- In a large bowl, mix flour, oats, brown sugar, cinnamon, baking soda, and salt.
- Pour in melted butter and stir until mixture resembles coarse crumbs.
- Press 2/3 of the mixture evenly into the prepared pan to form the crust.
- In a separate bowl, toss apples with granulated sugar and lemon juice.
- Spread the apple mixture evenly over the crust layer.
- Sprinkle remaining crumble mixture over the apples and gently press down.
- Bake for 40–45 minutes until golden brown and bubbly.
- Cool completely in the pan, then lift out using parchment overhang. Slice and serve.
Notes
- Use tart apples like Granny Smith for best flavor balance.
- Add chopped nuts (pecans or walnuts) to the topping for extra crunch.
- Bars store well refrigerated for up to 5 days or frozen for 2 months.
- For extra decadence, drizzle with caramel sauce before serving.