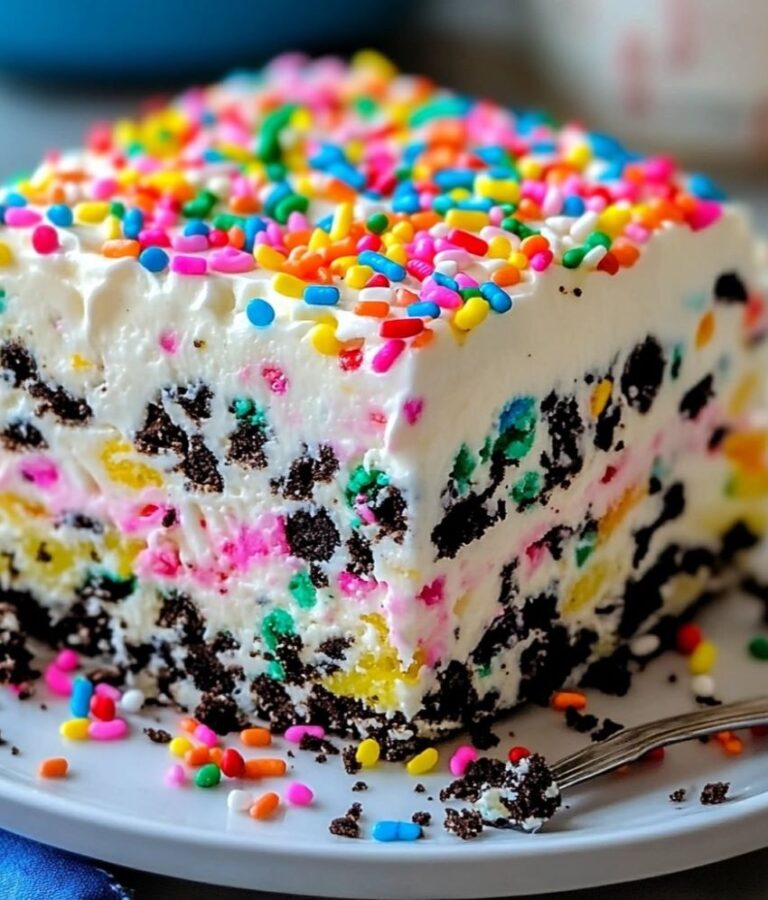
Easter Dirt Cake Casserole
Easter celebrations in my home always come with a sprinkle of color and a dash of sweetness, and this Easter Dirt Cake Casserole holds a special place on the table. It’s a nostalgic dessert that takes me back to my childhood, where simple yet delightful recipes were the star of family gatherings. I love how this dessert combines creamy layers, a crumbly Oreo base, and fun pastel decorations to bring joy to every bite. Perfect for kids and adults alike, this no-bake treat is incredibly easy to make. Whether you’re hosting an Easter party or just want something whimsical, this recipe is sure to be a hit. Let’s dive in!

Why You’ll Like It
- Quick and Easy: With only 20 minutes of prep time and simple ingredients, it’s hassle-free.
- Perfectly Festive: The pastel candy decorations make it an Easter showstopper.
- Crowd-Pleaser: This dessert is a favorite among kids and adults, making it ideal for family gatherings.
- No-Bake Delight: A chilled dessert means less time in the kitchen and more time celebrating.
- Customizable: You can switch up the pudding flavor, decorations, or even add a layer of sprinkles.
The Recipe
Ingredients
- 1 package (14 oz) Oreo cookies, crushed
- 1 package (8 oz) cream cheese, softened
- 1/4 cup unsalted butter, softened
- 1 cup powdered sugar
- 1 package (3.4 oz) instant vanilla pudding mix
- 2 cups cold milk
- 1 container (8 oz) whipped topping (Cool Whip), thawed
- 1 cup pastel-colored candy-coated chocolates (e.g., M&M’s)
- 1/2 cup mini Oreo cookies for topping
Instructions
- Prepare the Creamy Base:
In a large bowl, beat the softened cream cheese and butter together until smooth and fluffy. - Sweeten the Mixture:
Add powdered sugar to the bowl and mix until fully combined. Set aside. - Make the Pudding:
In a separate bowl, whisk the instant vanilla pudding mix with cold milk. Whisk until the mixture thickens, about 2 minutes. - Combine the Mixtures:
Gently fold the thickened pudding into the cream cheese mixture, ensuring everything is well blended. - Add the Whipped Topping:
Fold the thawed whipped topping into the pudding mixture, creating a creamy and fluffy texture. - Assemble the Layers:
In a 9×13-inch dish, spread half of the crushed Oreos evenly across the bottom. - Add the Filling:
Pour the creamy pudding mixture over the crushed Oreos, spreading it out evenly with a spatula. - Top It Off:
Sprinkle the remaining crushed Oreos on top. Decorate with mini Oreos and pastel candy-coated chocolates for that Easter vibe. - Chill and Serve:
Place the dish in the refrigerator and chill for at least 2 hours before serving.
Serving and Storage Tips
- Serving: Use a large spoon to scoop out portions, ensuring you get all the layers in every serving. Add extra candies on each plate for a festive touch!
- Storage: Store leftovers in an airtight container in the refrigerator for up to 3 days. Avoid freezing, as the creamy texture may change upon thawing.
Helpful Notes
- Flavor Twist: Swap vanilla pudding for chocolate or even strawberry pudding for a unique spin.
- Festive Add-Ons: Top with festive sprinkles, marshmallow Peeps, or even edible glitter for added Easter charm.
- Texture Tip: For a crunchier base, add half the Oreos just before serving instead of layering them all at the beginning.
- Diet-Friendly Options: Use reduced-fat cream cheese, sugar-free pudding mix, or light whipped topping to make it a bit lighter.
- Kids’ Activity: Let kids help decorate the top with their favorite candies for added fun!
Frequently Asked Questions
- Can I make this dessert ahead of time?
Absolutely! This recipe is perfect for preparing a day in advance. It gives the flavors more time to meld together, making it even tastier. - What other toppings can I use?
Besides candies and mini Oreos, try crushed graham crackers, colorful sprinkles, or chocolate shavings for variety. - Can I use homemade whipped cream instead of Cool Whip?
Yes, you can! Homemade whipped cream works wonderfully but might not stay as stable for extended chilling times. - What type of Oreos should I use?
Classic Oreos are ideal, but you can also use golden Oreos or a seasonal variety for a fun twist. - Is it possible to make this dessert dairy-free?
Yes! Substitute dairy-free cream cheese, almond or coconut milk, and a dairy-free whipped topping.
Final Thoughts
This Easter Dirt Cake Casserole is as fun to make as it is to eat! With its creamy, chocolatey layers and colorful candy decorations, it’s a crowd-pleaser for both kids and adults. Whether you’re hosting Easter brunch, a springtime gathering, or simply looking for a no-bake dessert, this recipe is a winner.
I love how customizable this dessert is—you can switch up the pudding flavor, use different candies, or add unique decorations to suit any occasion. Plus, the make-ahead convenience makes it a stress-free addition to your celebration.
Give this recipe a try, and watch it become a holiday favorite. Happy Easter and happy baking!

Easter Dirt Cake Casserole
Ingredients
- 1 package 14 oz Oreo cookies, crushed
- 1 package 8 oz cream cheese, softened
- 1/4 cup unsalted butter softened
- 1 cup powdered sugar
- 1 package 3.4 oz instant vanilla pudding mix
- 2 cups cold milk
- 1 container 8 oz whipped topping (Cool Whip), thawed
- 1 cup pastel-colored candy-coated chocolates e.g., M&M’s
- 1/2 cup mini Oreo cookies for topping
Instructions
Prepare the Creamy Base:
- In a large bowl, beat the softened cream cheese and butter together until smooth and fluffy.
Sweeten the Mixture:
- Add powdered sugar to the bowl and mix until fully combined. Set aside.
Make the Pudding:
- In a separate bowl, whisk the instant vanilla pudding mix with cold milk. Whisk until the mixture thickens, about 2 minutes.
Combine the Mixtures:
- Gently fold the thickened pudding into the cream cheese mixture, ensuring everything is well blended.
Add the Whipped Topping:
- Fold the thawed whipped topping into the pudding mixture, creating a creamy and fluffy texture.
Assemble the Layers:
- In a 9×13-inch dish, spread half of the crushed Oreos evenly across the bottom.
Add the Filling:
- Pour the creamy pudding mixture over the crushed Oreos, spreading it out evenly with a spatula.
Top It Off:
- Sprinkle the remaining crushed Oreos on top. Decorate with mini Oreos and pastel candy-coated chocolates for that Easter vibe.
Chill and Serve:
- Place the dish in the refrigerator and chill for at least 2 hours before serving.
Notes
- Flavor Twist: Swap vanilla pudding for chocolate or even strawberry pudding for a unique spin.
- Festive Add-Ons: Top with festive sprinkles, marshmallow Peeps, or even edible glitter for added Easter charm.
- Texture Tip: For a crunchier base, add half the Oreos just before serving instead of layering them all at the beginning.
- Diet-Friendly Options: Use reduced-fat cream cheese, sugar-free pudding mix, or light whipped topping to make it a bit lighter.
- Kids’ Activity: Let kids help decorate the top with their favorite candies for added fun!